FastGPT

首页 > 帮助 > 使用技巧 > 功能介绍 > 系统插件 > 如何开发系统插件

如何开发系统插件

FastGPT 系统插件开发指南(工具篇)

介绍

FastGPT 系统插件项目从 4.10.0 版本后移动到独立的fastgpt-plugin项目中,采用纯代码的模式进行工具编写。 在 4.14.0 版本插件市场更新后,系统工具开发流程有所改变,请依照最新文档贡献代码。

你可以在fastgpt-plugin项目中进行独立开发和调试好插件后,直接向 FastGPT 官方提交 PR 即可,无需运行 FastGPT 主服务。

目前系统插件仅支持“工具”这一种类型。

概念

  • 工具(Tool):最小的运行单元,每个工具都有唯一 ID 和特定的输入和输出。

  • 工具集(Toolset):工具的集合,可以包含多个工具。

fastgpt-plugin中,你可以每次创建一个工具/工具集,每次提交时,仅接收一个工具/工具集。如需开发多个,可以创建多个 PR 进行提交。

1. 准备开发环境

1.1 安装 Bun

  • 安装 Bun, FastGPT-plugin 使用 Bun 作为包管理器

1.2 Fork FastGPT-plugin 仓库

Fork 本仓库 https://github.com/labring/fastgpt-plugin

1.3 搭建开发脚手架


注意:由于使用了 bun 特有的 API,必须使用 bunx 进行安装,使用 npx/npx 等会报错

创建一个新的目录,在该目录下执行:


bunx @fastgpt-sdk/plugin-cli

上述命令会在当前目录下创建 fastgpt-plugin 目录,并且添加两个 remote:

  • upstream 指向官方仓库

  • origin 指向你自己的仓库

默认使用 sparse-checkout 避免拉取所有的官方插件代码

2. 编写工具代码

2.1 工具

依据提示分别选择创建工具/工具集,以及目录名(使用 camelCase 小驼峰法命名)。

系统工具 (Tool) 文件结构如下:


src // 源代码,处理逻辑└── index.tstest // 测试样例└── index.test.tsconfig.ts // 配置,配置工具的名称、描述、类型、图标等index.ts // 入口,不要改这个文件logo.svg // Logo,替换成你的工具的 LogoREADME.md // (可选)README 文件,用于展示工具的使用说明和示例assets/ // (可选)assets 目录,用于存放工具的资源文件,如图片、音频等package.json // npm 包

工具集(toolset) 的文件结构如下:


children└── tool // 这个里面的结构就和上面的 tool 一致,但是没有 README 和 assets 目录config.tsindex.tslogo.svgREADME.mdassets/package.json

2.2 修改 config.ts

  • name 和 description 字段为中文和英文两种语言

  • courseUrl(可选) 密钥获取链接,或官网链接,教程链接等,如果提供 README.md,则可以写到 README 里面

  • author 开发者名

  • tags 工具默认的标签,有如下可选标签(枚举类型)

    • tools: 工具

    • search: 搜索

    • multimodal: 多模态

    • communication: 通讯

    • finance: 金融

    • design: 设计

    • productivity: 生产力

    • news: 新闻

    • entertainment: 娱乐

    • social: 社交

    • scientific: 科学

    • other: 其他

  • secretInputList: 密钥输入列表,其用于配置工具的激活信息,通常包含密钥EndpointPort等。(见下面的 secretInputList 参数格式)

  • versionList (工具中配置)用于版本管理,是一个列表,其中的元素格式:

    • value:版本号,建议使用 semver

    • description: 描述

    • inputs 入参(见下面的 inputs 参数格式)

    • outputs 返回值 (见下面的 outputs 参数格式)

对于 ToolSet 下的 tool 来说,无需填写 typecourseUrlauthor,这几个字段会继承 ToolSet 的配置。

secretInputList 参数格式

一般格式:


{  key: 'key', // 唯一键  label: '前端显示的 label',  description: '前端显示的 description', // 可选  inputType: 'input' | 'secret' | 'switch' | 'select' | 'numberInput', // 前端输入框的类型  // secret: 密钥输入框,密钥将在保存时进行对称加密保存在节点内或数据库中  // switch: 开关  // select: 下拉选择框  // numberInput: 数字输入框  // input: 普通输入框}

下面的例子是 dalle3 的相关配置:可以参考 dalle3 的 config.ts


{  // 其他配置  secretInputConfig: [    {      key: 'url',      label: 'Dalle3 接口基础地址',      description: '例如:https://api.openai.com',      inputType: 'input',      required: true    },    {      key: 'authorization',      label: '接口凭证(不需要 Bearer)',      description: 'sk-xxxx',      required: true,      inputType: 'secret'    }  ]}

inputs 参数格式

一般格式:


{  key: '本工具内唯一的 key,和 src/index.ts 中的 InputType 定义相同',  label: '前端显示的 label',  renderTypeList: [FlowNodeInputTypeEnum.input, FlowNodeInputTypeEnum.reference], // 前端输入框的类型  valueType: WorkflowIOValueTypeEnum.string, // 数据类型  toolDescription: '工具调用时用到的描述' // 如果需要设置成工具调用参数,需要设置这个字段}

dalle3 的 inputs 参数格式如下:


{//...  versionList: [    {      // 其他配置      inputs: [        {          key: 'prompt',          label: '绘图提示词',          valueType: WorkflowIOValueTypeEnum.string,          renderTypeList: [FlowNodeInputTypeEnum.reference, FlowNodeInputTypeEnum.input],          toolDescription: '绘图提示词'        }      ],    }    // ...  ]}

outputs 参数格式


{  key: 'link', // 唯一键值对  valueType: WorkflowIOValueTypeEnum.string, // 具体可以看这个 Enum 的类型定义  label: '图片访问链接', // 名字  description: '图片访问链接' // 描述,可选}

dalle3 的 outputs 参数格式如下:


{  // ...  versionList: [    {      // ...      outputs: [        {          valueType: WorkflowIOValueTypeEnum.string,          key: 'link',          label: '图片访问链接',          description: '图片访问链接'        },        {          type: FlowNodeOutputTypeEnum.error,          valueType: WorkflowIOValueTypeEnum.string,          key: 'system_error',          label: '错误信息'        }      ]    }  ],}

2.3 编写处理逻辑

在 [your-tool-name]/src/index.ts 为入口编写处理逻辑,需要注意:

  1. 使用 zod 进行类型定义,导出为 InputType 和 OutputType 两个 Schema。

  2. 入口函数为 tool,可以定义其他的函数。


import { format } from 'date-fns';import { z } from 'zod';export const InputType = z.object({  formatStr: z.string().optional()});export const OutputType = z.object({  time: z.string()});export async function tool(props: z.infer<typeof InputType>): Promise<z.infer<typeof OutputType>> {  const formatStr = props.formatStr || 'yyyy-MM-dd HH:mm:ss';  return {    time: format(new Date(), formatStr)  };}

上述例子给出了一个传入 formatStr (格式化字符串)并且返回当前时间的简单样例,如需安装包,可以在/modules/tools/packages/[your-tool-name]路径下,使用bun install PACKAGE 进行安装。

4. 构建/打包

FastGPT v4.14.0 后,打包方式变为系统插件打包为一个 .pkg 文件,使用命令:

<button type="button" class="inline-flex items-center justify-center rounded-md p-2 text-sm font-medium transition-colors duration-100 disabled:pointer-events-none disabled:opacity-50 focus-visible:outline-none hover:bg-fd-accent hover:text-fd-accent-foreground [&_svg]:size-3.5" aria-label="Copy Text" style="border-width: initial; border-style: none; border-color: initial; margin: 0px; padding: 0px; font-style: inherit; font-variant: inherit; font-weight: 500; font-stretch: inherit; font-size: 14px; line-height: 1.42857; font-family: inherit; font-optical-sizing: inherit; font-size-adjust: inherit; font-kerning: inherit; font-language-override: inherit; font-feature-settings: inherit; font-variation-settings: inherit; letter-spacing: inherit; color: rgb(129, 129, 129); opacity: 1; border-radius: 6px; appearance: button; display: inline-flex; align-items: center; justify-content: center; --tw-font-weight: 500; transition-property: color, background-color, border-color, outline-color, text-decoration-color, fill, stroke, --tw-gradient-from, --tw-gradient-via, --tw-gradient-to; transition-timing-function: cubic-bezier(0.4, 0, 0.2, 1); transition-duration: 0.1s; --tw-duration: .1s;"></button>
bun run build:pkg

将本地所有插件构建打包为 .pkg 文件,构建目录为 dist/pkgs

5. 单元测试

FastGPT-plugin 使用 Vitest 作为单测框架。

5.1 编写单测样例

在 test/index.test.ts 中编写测试样例,使用 bun run test index.test.ts 完整路径 即可运行测试。

注意:不要把你的 secret 密钥等写到测试样例中

使用 Agent 工具编写测试样例时,可能 Agent 工具会修改您的处理逻辑甚至修改整个测试框架的逻辑。

5.2 查看测试样例覆盖率(coverage)

浏览器打开 coverage/index.html 可以插件各个模块的覆盖率

提交插件给官方仓库,必须编写单元测试样例,并且达到:

  • 90% 以上代码覆盖率

  • 100% 函数覆盖率

  • 100% 分支条件覆盖率

6. E2E (端到端)测试

对于简单的工具,可能并不需要进行 E2E 测试,而如果工具过于复杂,官方人员可能会要求您完成 E2E 测试。

6.1 部署 E2E 测试环境

  1. 参考 快速开始本地开发,在本地部署一套 FastGPT 开发环境

  2. cd runtime && cp .env.template .env.local 复制环境变量样例文件,连接到上一步部署的 Minio, Mongo, Redis 中

  3. bun run dev 运行开发环境,修改 FastGPT 的环境变量,连接到你刚刚启动的 fastgpt-plugin
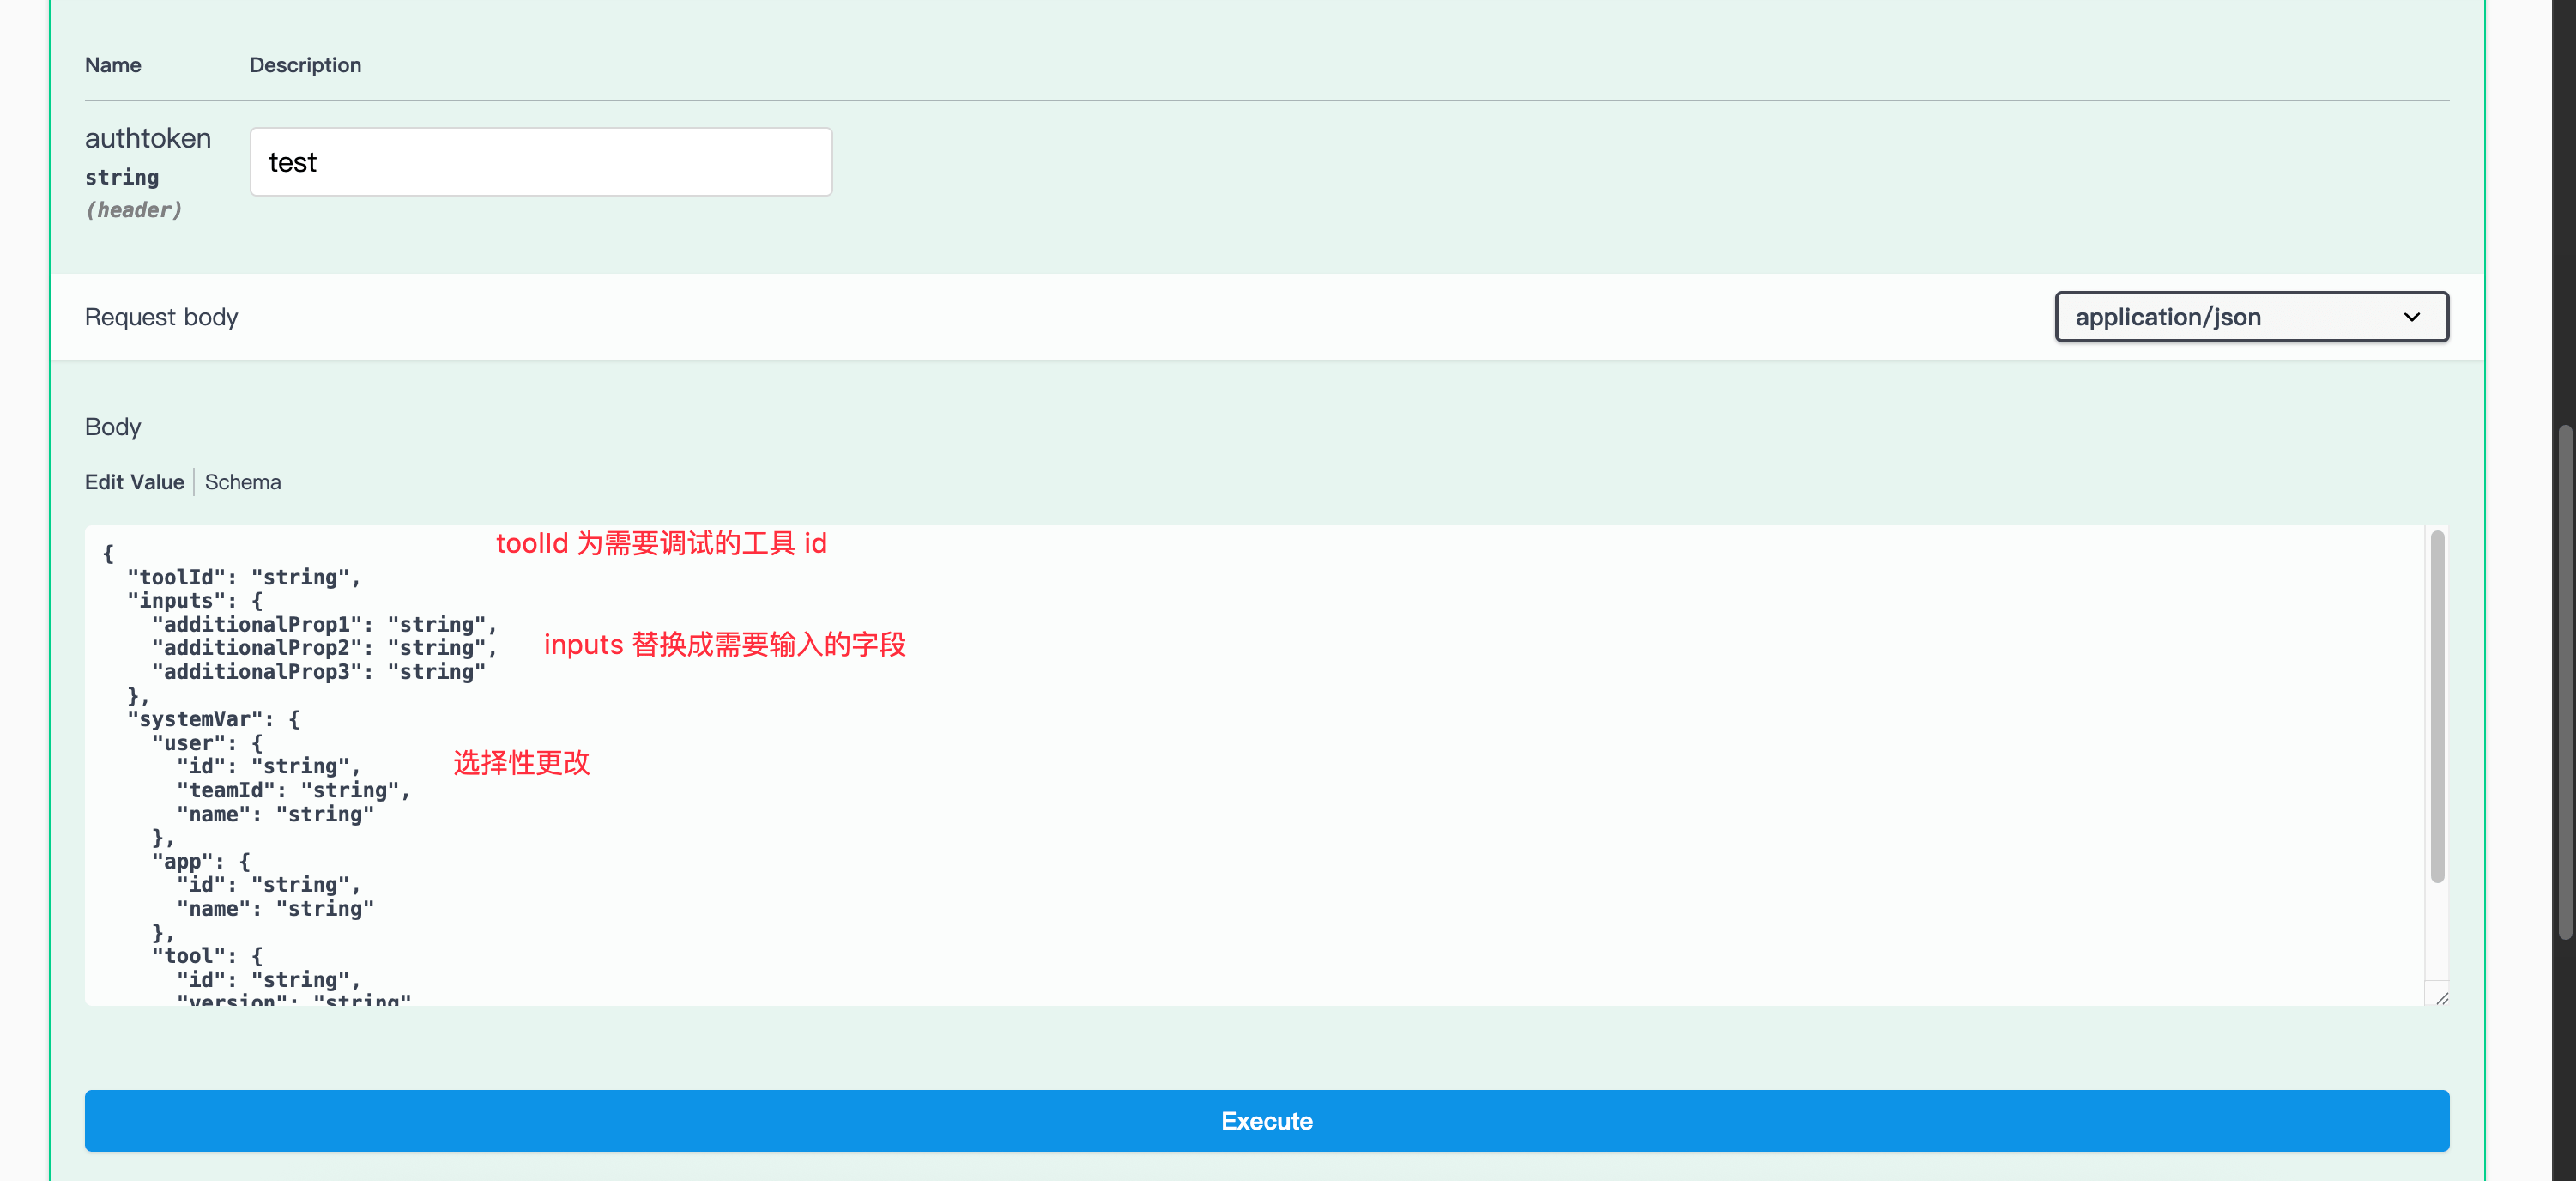
6.2 从 Scalar 进行测试

运行 fastgpt-plugin 开发环境

浏览器打开http://localhost:PORT/openapi可进入fastgpt-plugin的 OpenAPI 页面,进行 API 调试。 PORT 为你的 fastgpt-plugin 的端口

可以先通过/tool/list接口,获取工具列表,找到需要调试的工具的toolId。紧接着,通过/tool/runStream来运行工具获取实际结果。

6.3 在开发环境下 e2e 测试(有热更新)

默认情况下,fastgpt-plugin 会自动加载在 modules/tool/packages/ 下的所有工具,并自动监听文件修改并进行热更新。 可以在 FastGPT 中使用这些工具

6.4 在开发环境下上传工具进行 e2e 测试(没有热更新)

设置 FastGPT-plugin 的环境变量 DISABLE_DEV_TOOLS=true 会禁用自动加载开发环境下的工具,此时可以测试工具的上传。

7. 提交工具至官方目录

完毕上述所有内容后,向官方仓库 https://github.com/labring/fastgpt-plugin 提交 PR。 官方人员审核通过后即可收录为 FastGPT 的官方插件。

如无需官方收录,则可以参考 上传系统工具 在自己部署的 FastGPT 中使用。

上一篇 没有了
放大预览